The value of your role as a project manager and the success of your project are heavily dependent on how well you plan and initiate the project you are responsible for. If you start to execute a project without planning what is to be done, you may actively contribute to its failure. The same holds true if you do not adjust or change the project’s plans if they are no longer accurate or do not work.
The purpose of planning is not to create a map that is set in stone but to think through the project’s critical elements and steps before you make irreversible commitments and take irrevocable actions.
When you take the time to establish the project’s scope and analyze the requirements, problem domain, and solution up front, you are much more likely to understand the project’s core challenges and recognize what it takes to address them and deliver a quality product to the client.
There are many different ways of creating a plan. One of them is a product-based planning technique. With Product Based Planning, your focus is first and foremost on the products that need to be delivered as opposed to the activities the project needs to undertake. It means that you plan the project from the client’s and user’s perspective, because you put the focus on tangible deliverables and outcomes.
Product Based Planning is described as a technique in the PRINCE2™ Project Management Process. The description of the technique is excellent.
The Project Management Institute has many of the same concepts in their Project Management Body of Knowledge (PMBoK). The PMBoK describes the use of a Work Breakdown Structure (WBS) to identify the scope of the project.
The Capability Maturity Model Integration (CMMI®) highlights the same approach to planning where a Work Breakdown Structure (WBS) is used to help estimation of the project.
On the other hand, with so many project management appraisal guides, manuals and handbooks advocating this approach, putting Product Based Planning into action is still a challenge.
Product Based Planning is a four step process that helps us define a product we are trying to build, what sequence it should be built it, and what activities are then needed to actually build the product.
The four steps of Product Based Planning are to produce in order:
- An Overall Product Description
- A Product Breakdown Structure
- Product Descriptions for each product
- A Product Flow Diagram
The Big Picture
The following picture identifies many of the key elements found in Product Based Planning. The underlying the picture is the simple Plan, Do, Check, Act principles used for many years in the quality management area.
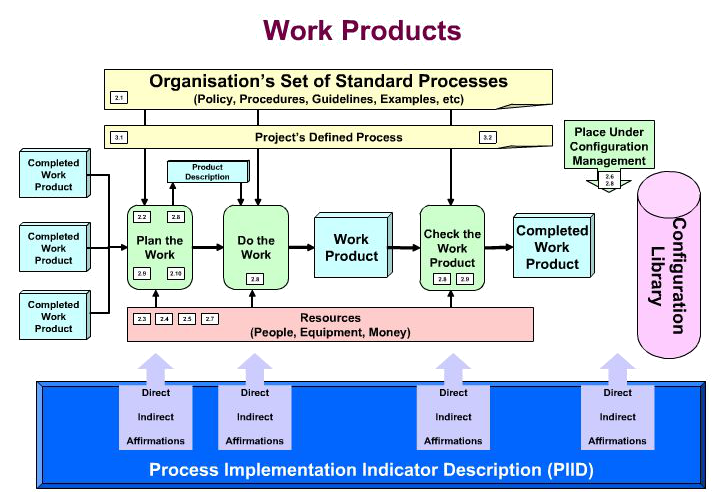
Some of the fundamental principles identified in the picture are:
- A plan needs to be prepared to produce or acquire the product: A plan needs to be in place to identify the activities, resources, processes and procedures,
and management required to create or acquire a product. The complexity of the plan depends upon the complexity of the product to be produced.
- Every product must have a product description: Why? If you have tried to build something without a simple and clear specification, the number of iterations
and wasted time tends to increase. A simple description of 'What' is needed also allows improved 'make, buy or modify' decisions'.
- Every product must be checked against its product description: After the product has been created or acquired, the product must have a quality check to
verify that the product that is required has been produced.
- Change management needs to be applied to both the product description and the product: Change management is a management decision making process to control
changes to products. Changes keep the product description and the produced or acquired product relevant and fit for purpose. This process ensures that all products
are in a known state, specific changes can be made and everyone is aware of the changes.
Terminology Notes:
A 'Project's Defined Process' is like a Project Quality Plan.
An 'Organization's Standard Set of Processes' or 'Management System' contains the descriptions of the processes and procedures, etc. that are used in an organization.
Definition of a Product (or Work Product)
Firstly let's establish what a product is. A product or work product is the result of work performed by an individual or a team. A product may be considered an outcome, a result, a deliverable that is created or acquired.
There are two types of Products that are created: Management Products and Specialist Products.
- Management Products are those products necessary to plan and manage a project.
- Specialist Products are the unique products produced for a specific class of project.
Examples of PRINCE2™ Management Products are:
- Project Quality Plan.
- Project Plan.
- Business Case.
- Project Brief.
Examples of Specialist Products are:
- Software Product, a complete working product or deliverable. This may be created or acquired.
- Software Component, a software component is a product that forms part of a software product. This may be created or acquired.
- Software Package Rolled out, the installation, training, and effective usage of a software product is a product that defines a result or outcome.
- Organizational Unit Established, the identification, appointment of a manager and creation of a unit plan is a product that defines a result or outcome.
Products are described in terms of the object that is created or acquired or result or outcome that is achieved. There must be a clear distinction between the activities (verbs and actions) that create the result or outcome.
Other types of products have been identified in the Product Based Planning Technique. The following are described in the PRINCE2™ Manual:
- Final Product (2005) or the Project Product Description (2009).
- Integration Product.
- Grouping Product. A Product to create or acquire:
- Prepare to create the product.
- Create the product.
- Quality check the product.
A work package provides a management structure to create or acquire one or more products.
Product Based Planning Technique
Overall Product Description

|
This is simply a clear description of the major product we are trying to build in this project or program. This could be, for example, a database, a car, or a submarine, for example. If you already have a project team in place then you should already have an understanding of what the project is trying to deliver. These requirements come from the business or product owner. It is created right at the start of your project and contains some really useful information, such as the customer’s quality expectations and acceptance criteria. All of which helps both with planning and getting sign-off at the end. This overall product description:
|
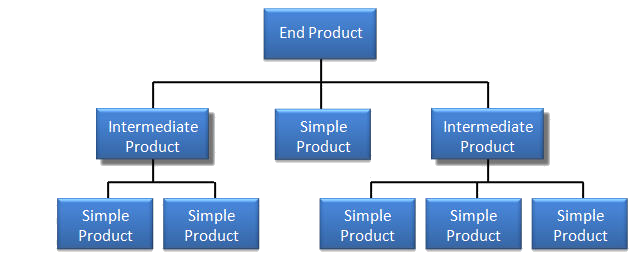
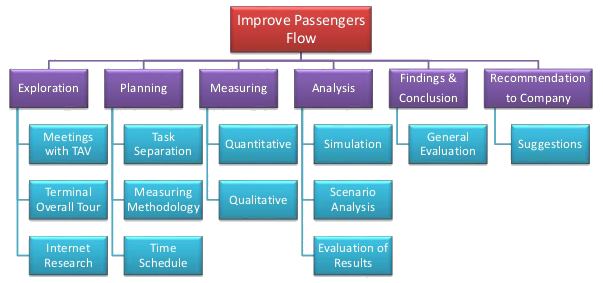
Product Breakdown Structures
A Product Breakdown Structure is simply a hierarchical and complete decomposition of the overall product we are trying to create. The advantages of breaking down the overall product into lower and lower levels include that it makes it easier to estimate the project, it makes it easier to apply quality criteria, and it helps us avoid missing products or sub-products.
In all but the simplest of projects, no one person will be able to identify all of the products. The best way to identify the products is to hold a workshop with relevant people from across the project – not only will this help tease out the products, but it will help build a common understanding of what the project is to deliver, and joint ownership of that. It’s best to try and identify some of the main top level product groups before the workshop, but not essential.
The workshop should comprise a series of steps:
- People think about products and write each product on a sticky note.
- All the sticky notes are put on a wall.
- Review the sticky notes and remove duplicates.
- Review the remaining sticky notes and put them in related groups.
- Repeat the steps as necessary until everyone feels that all the products have been identified, (usually three or four iterations is enough).
At the first run-through people will be a little uncertain, so allocate a reasonably short period of time for the first step – once a few sticky notes are up on the wall and they can see how things get grouped, they’ll cotton on and become more productive.
There are a number of ways to represent the work and the work products. PRINCE2™ identifies the need for a Product Breakdown structure; The Project Management Institute and the Software Engineering Institute identify the need for a Work Breakdown Structure. The following are some of the types of breakdown structures that can be used:
|
Product Breakdown Structure: An outcome, result, or deliverable view of the items to be created or acquired. This type of chart provides a clear focus on the completion of products. The PRINCE2™ Manual provides some examples for producing Product Breakdown Structures. |
|
|
Work Breakdown Structure: A work breakdown structure may represent the outcomes, result or deliverable view or other views, such as, Stages, Phases, or Tasks (i.e. the work to do) or a combination of both. A Product Breakdown Structure is a type of Work Breakdown Structure that focuses only on outcomes, results, or deliverables. |
|
Organization Breakdown Structure: An Organization Breakdown Structure identifies the team structure for carrying out the work. This is typically shown as an Organization Chart. |
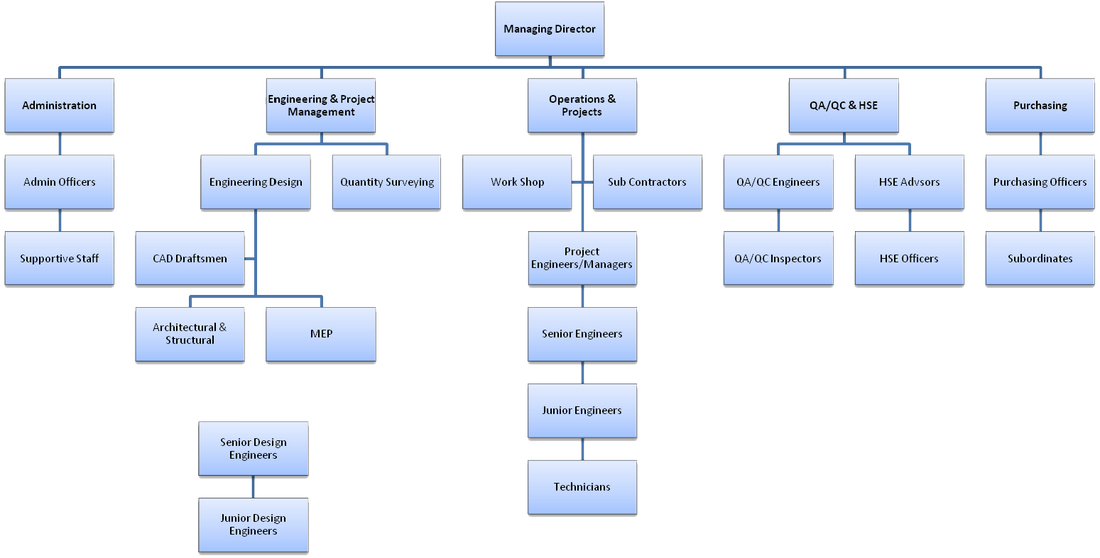
|
The Project Management Institute PMBoK® Guide provides examples of many of the types of breakdown structures.
Product Description for each Product

|
Once you’ve developed your Product Breakdown Structure you need to develop a Product Description for every product in your PBS. This is essentially a clear and precise description of the product to provide enough information to estimate the work required to create the product and ensure that the individuals or team create or acquire the product that is needed. Typically this will include the following, but can include additional information:
|
The PRINCE2™ Manual includes a Product Description for the Product Description. (Please see the PRINCE2™ Manual for the complete description of the product description See Appendix A.22 (2005) or A.17 (2009)). Some of the important elements are shown below:
- Title: A unique name for the product.
- Identifier: A unique name for the product.
- Purpose: A short statement that identifies why this product is necessary.
- Composition: A description of what this product is, contains, or the result to be achieved.
- Derivation: A description of items necessary to help create or acquire the product. These may be specifications, guidelines, procedures or other products.
- Quality Criteria: The criteria that the product must meet to be fit for purpose.
- Quality Method: The method that will be used to check the product meets the stated quality criteria.
Product Flow Structures
The final thing to do in Product Based Planning is to produce a Product Flow Diagram (PFD). To create the PFD you take the products from the PBS and sequence them in the order they will be created. The order that products are created or acquired can have a significant impact on the successful completion of a project. If products are developed in the wrong order, there may be significant rework, unplanned development or loss of resources at critical times. Here you will answer questions such as:
- What other products is each product dependent on?
- Are there dependencies outside the scope of the PBS?
- Can any parallelism be achieved?
- Have we missed anything?
Underlying these dependencies is the importance of actually completing the products to a known degree of completion. A 90% completed product may not have any value where a fully complete product under configuration management may provide a stable base for development of later products.
There are a number of visual approaches to identification and management of the order that products are completed. The types of visual diagrams that are available are:
|
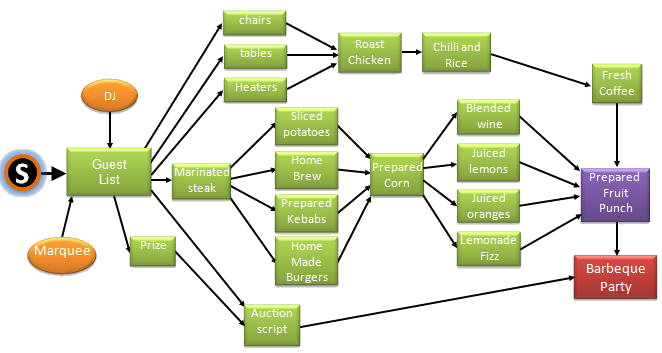
Product Flow Diagram (PFD): A Product Flow Diagram (PFD) is described in the Product Based Planning Technique of PRINCE2™. This diagram identifies the order that products need to be completed and the products that are necessary to be completed before other products can complete. Some examples of PFDs are provided in the PRINCE2™ Manual. |
|
|
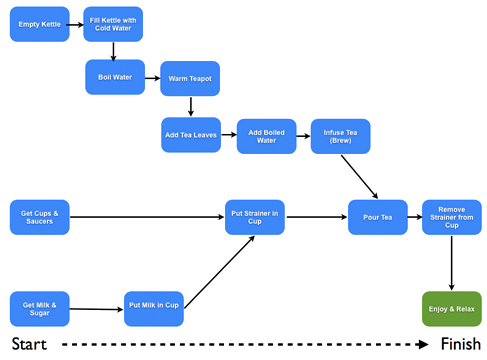
Precedence or Network Diagram: A precedence or network diagram generally identifies the relationship between tasks in a plan. These relationships are generally used when scheduling
the tasks to ensure that the necessary task dependencies are met relative to the completion of a task. The relationships are generally:
In this type of diagram, the tasks are represented as boxes. |
|
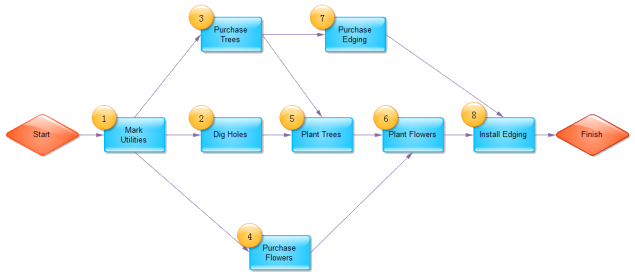
PERT Chart: A PERT Chart (Programme Evaluation and Review Technique) identifies the tasks on the line between start or completion nodes. The purpose of this diagram is essentially the same as the Precedence or Network Diagram. In this type of diagram, the tasks are represented as lines between start and end nodes. |
|
Complete Planning
The steps above completes the product based planning technique, but the plan document has not been finished yet….
Produce a High-Level Plan
|
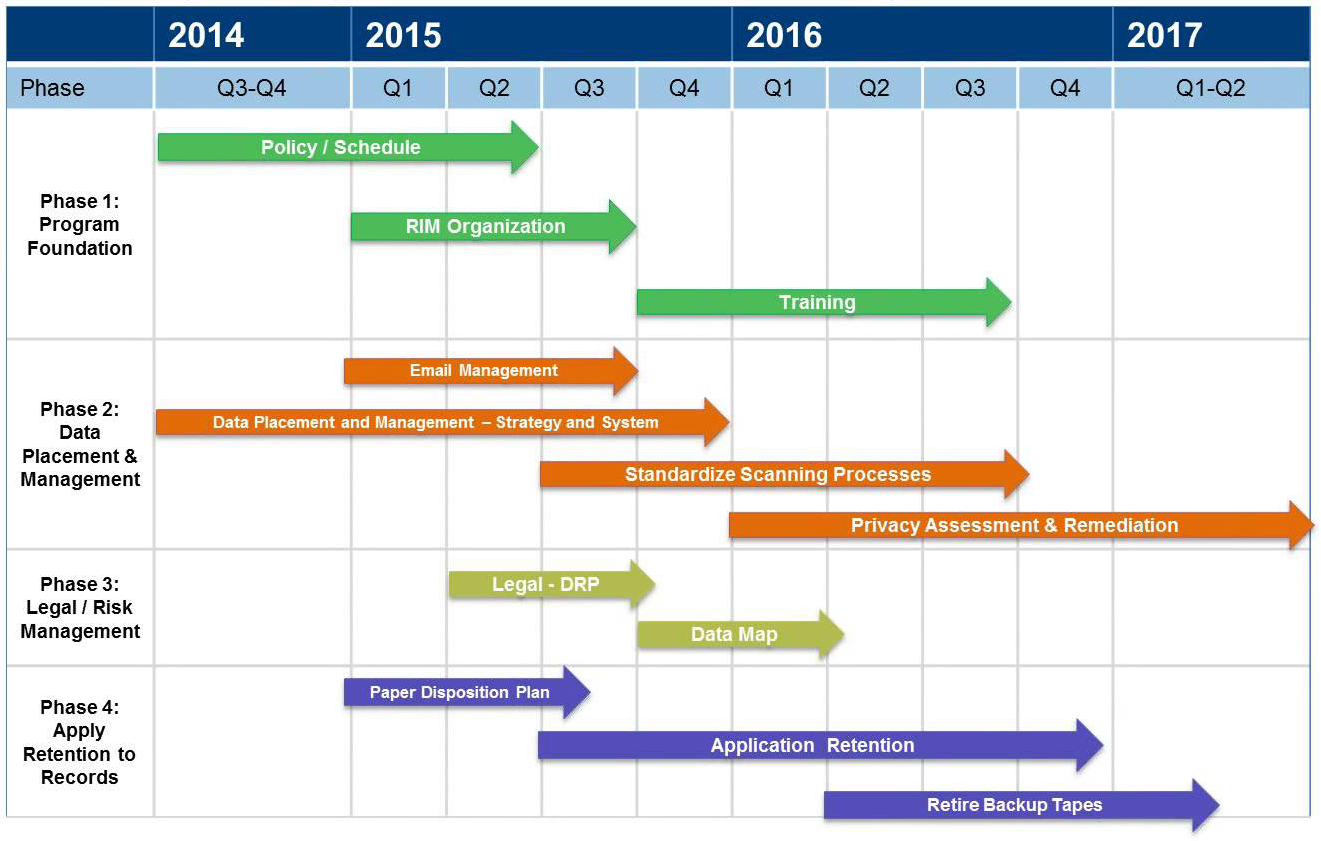
Use the product flow diagram as the guide for creating a road map and a straw-model scenario that you can use to jump-start more in-depth planning conversations and activities. In the early stages of the planning process, you may have to make many assumptions and use approximate durations and timings. Determine the sequence in which you aim to deliver the products, then arrange them into phases with clearly defined milestones. Aim to deliver the core and most critical part of the solution first. Once you know what the distinct phases are, focus on the first phase and break down its sub-deliverables into as much detail as you can, preferably until you have individual tasks and activities that would take days, rather than weeks, for a team member to execute. Continue breaking down the subsequent phases of the project, but use a broader brush for the later phases, where you might not yet have full understanding of the detailed activities that need to be carried out. |
Estimate and Assign Resources
Start assigning resources to your plan, and tighten up the estimated duration of individual tasks. In order to do that, you must understand which resources are available and also plan for the possibility of their being unavailable. Play around with different resource levels to get a good feel for when the project might complete.
When doing so, identify and pay special attention to the project’s critical path. The critical path is the longest sequence of dependent activities in your schedule that must be completed by the due date in order for the project to be on time. It is the critical path that will determine the actual duration of the project, as all other activities can be scheduled in parallel. More than anything, it is the critical path that you must pay close attention to throughout the execution of the project to make sure that the overall project time line does not slip.
|
PRINCE2 gives little advice on estimating, and this is a good thing, because projects and industries will vary greatly in their use of estimating techniques. Techniques that could be use include:
|

|
Produce Schedule
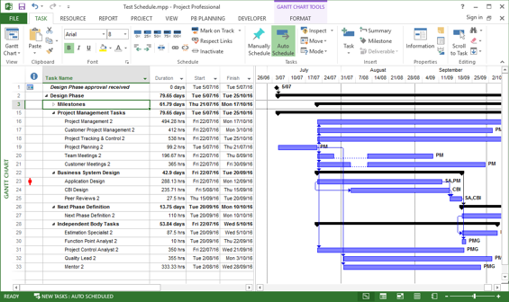
|
Using the name of each product in turn, get the participants to create new post-it notes, one for each activity that would be necessary to create each product. These new post-it notes can now be used directly to create a traditional network diagram. The product post-it notes will be represented on such a diagram as a milestone. What happens next will depend upon the complexity of the project. PRINCE2 assumes the use of a planning tool, and it is often best to bring this planning meeting to a close, and use the network diagram as an information source to enter activities directly into such a tool. The remaining steps within scheduling can now take place, such as Critical Path analysis, resource leveling and loading, agreeing control points, and the creation of other costs and resource plans. |
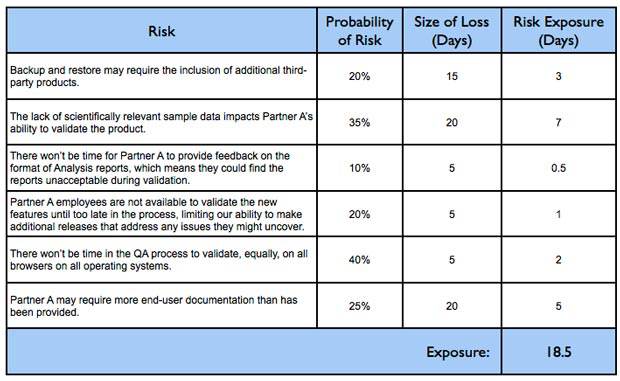
Perform Risk Analysis
|
This consists of using the team to determine what the risks are facing this particular plan. This uses risk analysis including the selection of possible risk responses. These actions will need to be built into the plan in the form of activities and resources — resulting in returning to previous steps to include these resources for example within the network diagram. It is important to take detailed notes here for inclusion within the Risk Register late – particularly allocation of each Risk Owner. |
|
Complete and Present the Plan
|
This is the final step, and since in PRINCE2 all plans documents, the narrative sections of the plan can now be created — resulting in the completed draft document. Before you provide your sponsor and steering committee with the outline plan, review it one last time with members of the team Project Assurance should review all draft copies of Plans), and make sure you have added sufficient contingency to the critical path. Remember that it is better to under-promise and over-deliver than the other way around.
Once stakeholders see a schedule, they have a tendency to think it is set in stone. Plan for worst-case scenarios, and provide a range of dates within which you expect to deliver the
project, as opposed to just one fixed date. Explain to your stakeholders what your planning assumptions, risks, and issues are, and make it very clear that events are not set in
stone. Explain that you will update and refine the plan frequently as you move through the project and that you will keep them informed of any changes. |
Putting into Practice
So now you want to put this PRINCE2 Product-Based Planning technique into practice; are there any tools that help?
If you want to get a strong tool that put this whole process easily in your hands, check out Castellan Systems' new product, Artificer. an add-on to Condotiero. Otherwise, for a basic approach using tools you should already have at hand, check out this article in our knowledge base.
Some of this material originally published by pbpkb.com and an article by Susanne Madsen published in www.tomsplanner.com
Copyright in part 2005, 2007, 2009, 2010, 2011, 2012, 2013, 2014, 2015 © Customer Driven Solutions Limited & © 2011 Susanne Madsen

